QN8066
Controlling QN8066 via Python
This folder contains a Python application that can be run on Windows, Linux, or Mac OS operating systems and allows the user to control a transmitter based on the QN8066. The idea behind this application is similar to the one presented in the “07_WEB_WIFI_CONTROL” folder of this repository, but instead of using a web browser and HTML, this application uses sockets to establish the connection between the client application (Python) and the ESP32.
The ESP32 is an excellent choice for socket-based applications due to its robust networking capabilities, high performance, and ease of integration with Python. Whether you’re building a home automation system, a remote control interface, or a data monitoring tool, the combination of ESP32 and Python provides a flexible and powerful solution for IoT and real-time communication projects.
ESP32 and QN8066 connections
Before starting compiling ESP32 based sketches, you must configure your Arduino IDE. Follow the steps below:
- Install the last version of Arduino IDE
- Configure the ESP32 on Arduino IDE
- Open the Arduino IDE and select the Preferences… menu item.
- Go to Additional Boards Manager URLs: and add the URL: https://raw.githubusercontent.com/espressif/arduino-esp32/gh-pages/package_esp32_index.json
- After adding the ESP32 URL, go to Tools menu, select the Boards item and then select Boards Manager… option. Finally install ESP32 board.
The following electronic circuit is the same as presented in the web version. The PWM interface should only be used if you intend to utilize this type of interface to control the transmitter’s power. It is important to note that the PWM is not related to the QN8066 but rather to the RF amplifier developed with this type of control.
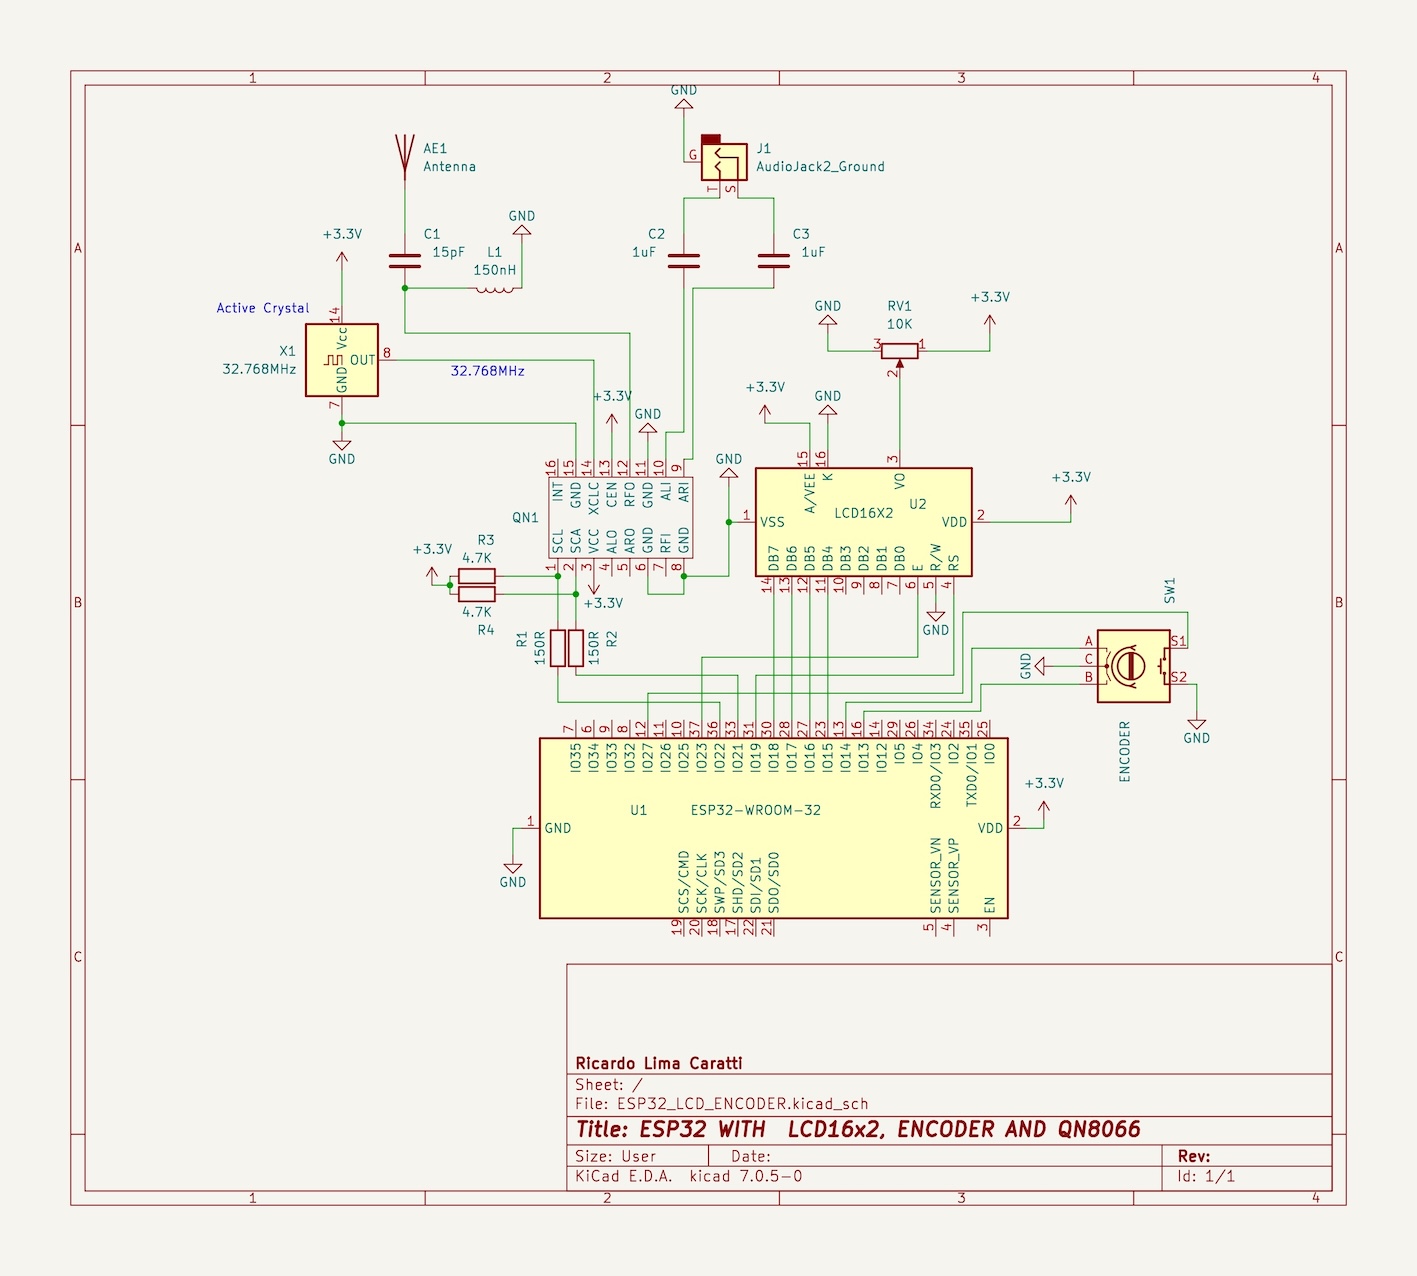
| Device name | Device Pin / Description | ESP32 Pin |
|---|---|---|
| QN8066 | ||
| VCC | 3.3V | |
| GND | GND | |
| SDIO / SDA (pin 8) | GPIO21 | |
| SCLK (pin 7) | GPIO22 | |
| PWM | GPIO12 |
QN8066 controller based on ESP32 and Python Form via Socket
The following image illustrates a form developed in Python that allows configuring a QN8066-based transmitter from a computer.
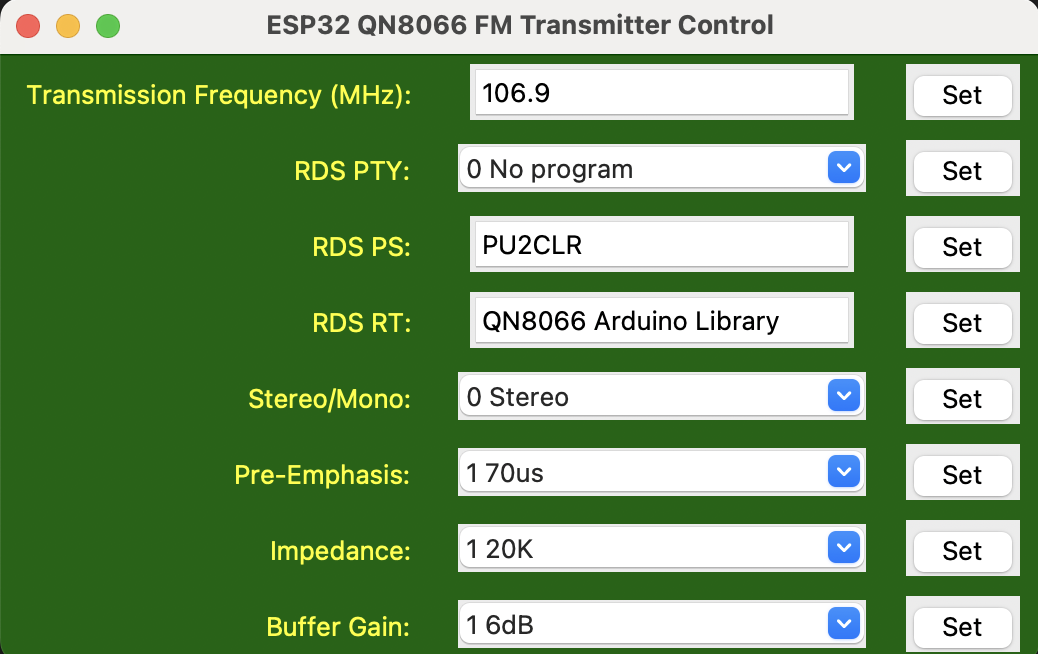
The Python application was developed using version 3.12.6 and employs the Tkinter GUI module to provide a user-friendly interface. This setup enables easy interaction with the QN8066-based transmitter. Further details regarding the environment configuration required to run this application are outlined below, including instructions on how to install dependencies and properly configure the system for optimal performance.
Setting Up Python and Tkinter on Windows, Linux (Debian-based), and Mac OS
To run the Python application with a graphical user interface (GUI) using Tkinter, it’s essential to ensure that both Python and Tkinter are installed and properly configured. Tkinter is the standard Python library for creating GUIs, and it’s typically included with most Python installations. Below are the instructions for configuring Python and Tkinter on different platforms.
1. Python Version
- Ensure that you are using Python 3.7 or higher. Tkinter is included with most modern versions of Python, but you may need to install it separately on some platforms.
A. Windows Setup
Step 1: Install Python
- Download Python: Go to the official Python website and download the latest Python 3.x version.
- Install Python:
- Run the installer.
- Ensure you check the box that says “Add Python to PATH”.
- Click on Install Now and follow the prompts.
Step 2: Verify Python and Tkinter Installation
- Open Command Prompt and type:
python --versionThis should display the installed version of Python (e.g.,
Python 3.9.5). - To verify if Tkinter is installed, open a Python prompt by typing
pythonand run:import tkinter tkinter._test()This should open a small Tkinter window if everything is set up correctly.
Step 3: Install Tkinter (if needed)
- Tkinter is included with Python on Windows. However, if Tkinter is not installed, you can add it manually:
- Open Command Prompt and run:
pip install tk
- Open Command Prompt and run:
B. Linux (Debian-based, such as Ubuntu) Setup
Step 1: Install Python
- Open a terminal and ensure Python 3 is installed by running:
sudo apt update sudo apt install python3 - Check the installed version by running:
python3 --version
Step 2: Install Tkinter
Tkinter is not always installed by default on Linux systems. To install it, run the following command:
sudo apt install python3-tk
Step 3: Verify Tkinter Installation
Once Tkinter is installed, verify it by running the following command in a Python environment:
python3 -m tkinter
This should open a small Tkinter window if the installation was successful.
C. Mac OS Setup
Step 1: Install Python
Mac OS often includes a version of Python 2.x, so you will need to install Python 3:
- Download Python from the official Python website.
- Run the installer and follow the prompts.
Alternatively, you can install Python using Homebrew (a package manager for Mac OS):
- Install Homebrew by running:
/bin/bash -c "$(curl -fsSL https://raw.githubusercontent.com/Homebrew/install/HEAD/install.sh)" - Use Homebrew to install Python 3:
brew install python3
Step 2: Verify Python Installation
Open a terminal and check the Python version:
python3 --version
Step 3: Verify Tkinter Installation
Tkinter usually comes with Python on Mac OS. To verify Tkinter, run:
python3 -m tkinter
This will open a small window if Tkinter is installed correctly.
Step 4: Install Tkinter (if needed)
If Tkinter is not installed, you can add it using Homebrew:
brew install python-tk
Common Steps for All Platforms
Installing Additional Dependencies with pip
You may need to install additional Python libraries, such as socket or ttk (part of Tkinter). To install these, use pip, which is included with Python 3.
To install libraries, open a terminal (Command Prompt on Windows) and run:
pip install some_package_name
For example, to install the socket library (though it’s included with Python):
pip install socket
Running the Application
Once Python and Tkinter are installed and verified, you can run your Python application by navigating to the folder where your script is located and running:
python3 esp32_QN8066.py
- On Windows, you can use
python esp32_QN8066.py. - On Linux (Debian-based) and Mac OS, use
python3 esp32_QN8066.py.
This will launch your GUI application built with Tkinter and communicate with the ESP32.